Discord Integration - Streamer Setup
Overview
This will allow viewers of your stream to trigger custom commands and check points in your Discord channel.
Important: Built-in Mini-Games and a few other things will not respond back in discord. Only custom commands and the point check command will respond back to users.
Note: To make custom commands only respond to discord responses, make sure you only have Discord Box checked in the Command Editor for the command. (Un-check Channel/Whispers.) Also, you can use “/discord” in the beginning of the channel message to send anything after “/discord” to discord.
Setup
Important
- Note: You must enable both bot and streamer whisper interaction settings in your master settings. (Config Tab > Master Settings > Misc Settings Section)
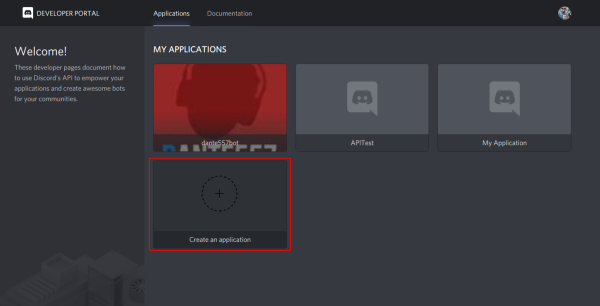
1. Go the the following LINK and select “Create An Application”
2. Under “General Information” enter the following
- A. “Name” (Bot Name or whatever you wish)
- B. “Description” (Anything)
- C. “App Icon” (optional)
Make a copy of your client ID. You are going to need it later.
3. Under “Bot” click “Add Bot”. It will then come up with a warning that the action cannot be reversed. Click “Yes, do it!” to this warning. As if you're on the hunt for pokémon a wild botachu will appear. Make it your own by giving it a nickname and an avatar. Also deselect “Public Bot” and “Requires OAuth2 Code Grant” because botachu doesn't need to evolve into a raibot.
4. Click to reveal your bot's token. With the client ID that you copied earlier on the “General Information” page and the token on the “bot” page you have everything that you need to get Deepbot and Discord to play nicely in the playground
5. Now we have the required information, navigate to your DeepBot application.
- A. In “Master Setting > General” Scroll to the bottom and find the section named “Discord Connection”.
- B. Copy the “Client/Application ID” and “Token” into the corresponding boxes.
- C. Press the “Connect” button to verify you entered the token correctly and the box should become green.
- D. Hit “Join Server” and you should be redirected to your browser.
- E. Select the server you want your bot to join using the dropdown and hit “Authorize”.
- F. Back in DeepBot, press “Refresh Status” and see your Discord server name appears.
5. In the box labeled “Monitor Channels” enter the channel you wish your bot to monitor for command triggers.
(To add multiple channel separate with a “,” and no spaces e.g. streamteam_bot,general,welcome,staff)
(Also now change any other settings you now wish to. You can always return later. See the settings section HERE for more information)
You can now press “Save” on the “Master Settings” window and continue to the next guide HERE
Settings
Master Settings:
- Bot Token: Your application Token from Discord Developers Applications
- Client Application ID: Your application Client/Application ID from Discord Developers Applications
- Connected Server: When “Refresh Status” is pressed, this will show the connection status of your Discord bot. This will be “Not in any Server” or the name of your connected Discord server.
- Monitor Channels: These are the channels your Discord bot will look for custom command triggers in. See Setup section 5 for more information on configuration.
- Broadcast Channels: These are the Text Channels your “Go Live Broadcast Msg” will post in when your Twitch Channel goes live. To add multiple channel separate with a “,” and no spaces e.g. streamteam_bot,general,welcome,staff
- Go Live Broadcast Msg: This is the message that will be posted in your Discord channel when your Twitch channel goes live. Variables Available: @user@, @game@, and @title@ (Other Variables may work.)
- e.g. @user@ is now live! Come check it out. https://twitch.tv/@user@ OR NOW LIVE | @title@ (@game@) | https://twitch.tv/@user@ | @everyone
- Advanced Users: Custom Commands can be ran by entering the !xxxx trigger.
- Allow commands to be run via Discord DMs: This will also viewers to use custom command triggers in Discord private messages.


